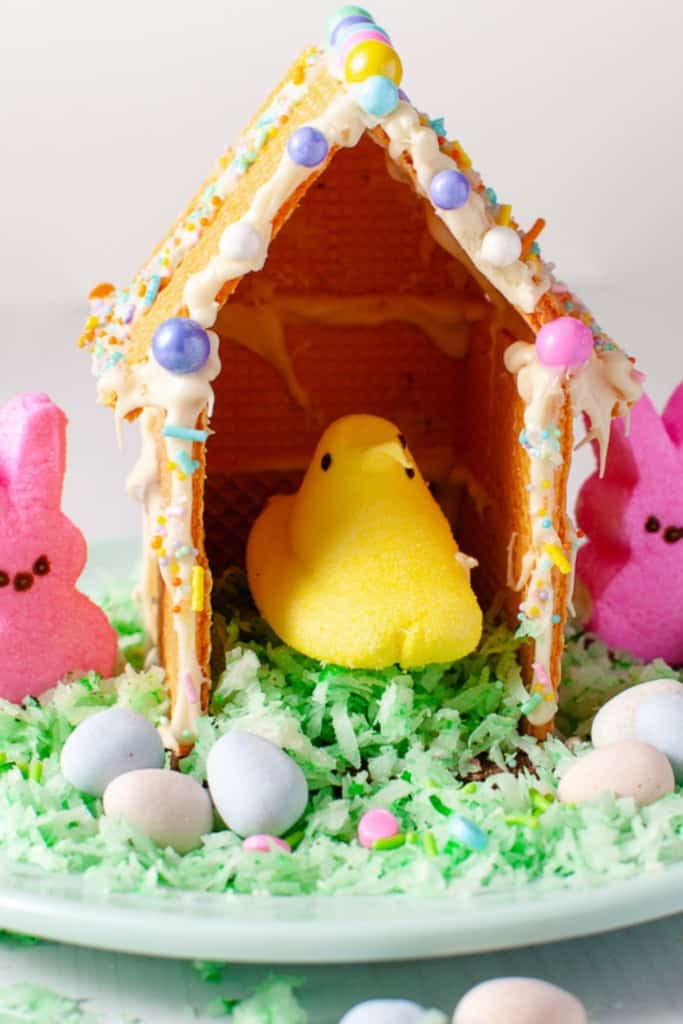
Make a Cute Easter Peeps House Kids Craft
If you are looking for a fun Easter craft to make with your preschooler or toddler you can not go wrong with making these cute peeps houses. Your kids and you will have so much fun decorating a little house for your Easter marshmallow peeps.

Making these adorable peeps houses is a fun edible peep craft that the whole family can get involved in. Fun to decorate the Easter Sunday table and fun to eat as a dessert.
The houses can be made of wafer cookies like I have for mine or they can be made of graham crackers. And if you are really ambitious this Easter, you can make the houses out of gingerbread and have a peep gingerbread house.
Just make sure you are using white melting chocolates to hold your little peep house together. My first try was with a stiff buttercream and let’s say the cute little house you see is the third try.
While the buttercream frosting was delicious it just could not handle the weight of the decorations. My peep house was beautiful with piped frosting but when I tried to decorate the roof, it fell flat each time. Using the white chocolate melted became firm in just a few minutes so we were able to start the fun part of the decoration.

This post contains some affiliate links for your convenience (which means if you make a purchase after clicking a link I will earn a small commission which helps keep my blog up and running but it won’t cost you a penny more)! Click here to read my full disclosure policy.
Tips for Making Easter Peeps Houses
- Melt the melting chocolates in a glass measuring cup and then transfer them to a sturdy ziplock bag. Cut off the tip of one corner, but very small.
- You could also make a royal frosting that also hardens quickly, but the white chocolate tastes better.
- I believe next time I will buy a plastic piping tip and use a piping bag as with the ziplock bag it worked perfectly, it was a bit drippy. With a plastic tip you could remelt the bag and tip in the microwave it started to harden.
- After you have the walls up let the chocolate harden a few minutes before you try to put the roof on.
- If your roof consists of 2 or 3 cookies, assemble each side on a flat service first, let this harden and then put the walls on.
- You can also decorate the roof pieces when they are flat and not on the house. This helps you not knocking the walls over.
- Make edible green grass for your little Easter Peeps with coloring chocolate. Place 1/2 of a bag of coconut in a zip lock bag and add 2 drops of green food coloring. You can use less or more of the food coloring to get the color you want. You can also add a little water to get the color to be more even.
- When the house is dry and able to move, place it on a plate or tray. Add the grass around the house and inside for the little peep to sit on.
- Decorate the house and plate with sprinkles, chocolate eggs, and a few marshmallow bunnies if you like.
- Let your kids decorate as much or a little as they like to make each house theirs. own.

You will need sweetened coconut, a ziplock bag and green food coloring to make edible Easter Grass.

Add half the bag of coconut to the ziplock bag, add 2 to 3 drops of food coloring and close the bag. Shake and mush around until all the coconut is the color green you would like.

Now you have the perfect edible grass for your landscape for the adorable Peeps Houses.

Make sure to add jelly bean, M&Ms, Cadbury mini eggs, and marshmallow peeps. Lots of coconut grass for a bed for your peep to sit on.


Make a Cute Easter Peeps House Kids Craft
If you are looking for a fun Easter craft to make with your preschooler or toddler you can not go wrong with making these cute peeps houses. Your kids and you will have so much fun decorating a little house for your Easter marshmallow peeps.
Materials
- Vanilla Wafer Cookies
- Chocolate Wafer Cookies
- White Chocolate Melting Wafers
- Sprinkles
- Sweetened Coconut Flakes
- Green Food Coloring
- Yellow Marshmallow Peeps
- Pink Marshmallow Bunnies
- Chocolate Eggs or Easter Candy for Decorations
Tools
- Ziplock Bags
- Glass Measuring Cup
Instructions
- Have all of the materials and tools out and ready to go.
- Cover your counter with a paper towel or wax paper. I used wax paper in a cookie sheet to keep all the items together.
- Start by filling a ziplock bag with 1/2 of the bag of coconut. Add 2 to 3 drops of green food coloring to the bag. Close the bag and shake and mush until all the coconut is green.
- Add about 1 cup of white chocolate melting wafers in your glass measuring cup and melt in the microwave, 30 seconds at a time, until the chocolate is melted.
- When the chocolate is melted but not too hot add to a second plastic bag and close the top.
- Take 3 of the chocolate wafer cookies and set them side by side to form the floor of the house.
- Cut a tiny hole in the corner of the chocolate baggie and spread a line of white chocolate to connect the floor cookies.
- Take 2 or 3 or 4 vanilla wafer cookies and make three walls for the house. (depending on how big you want your house to be). Again spread a line of chocolate between the cookies to hold them together.
- Next, use the chocolate to connect the walls on the two sides.
- Connect the walls to the base of the chocolate cookie floor.
- While the base of the house hardens together time to build the roof.
- Now for the Roof. Take 3 vanilla cookies and connect with the white chocolate to make one side of the roof. Do this flat on the counter, not on the house. Repeat for the other side of the roof.
- Use more white chocolate and sprinkles and decoration to decorate the roof sides. So not move them until the chocolate hardens.
- Now start gluing the roof to the house with the white chocolate and let harden before you make any more decorations.
- Set the house on a plate or tray, add the green coconut (edible Easter grass), the Peep, and any other decorations.
- Now you have a cute little Peep House for your Easter table or decorations.