Italian Canned Pickled Hot Peppers Easy Beginner Recipe
These delicious Italian canned pickled hot peppers are fresh from the garden. A simple recipe for beginner home canning with a step-by-step process that is easy to follow. Simple basic steps to have your own canned Italian pickled hot peppers.

This is our family’s favorite way to use up all the peppers from the garden every summer. Process the jars with the water bath method and they’ll keep in your pantry for up to two years, or skip the canning and just refrigerate them to eat right away.
We make ours semi-hot, but you’re in charge of the heat. Add more or fewer hot peppers to make them as mild or as spicy as your family likes. They’re so good piled on a hot dog or folded into a breakfast omelet.
Use whatever peppers you have, garden-grown or store-bought. This recipe calls for a generous mix of sweet and hot peppers, so it’s a great way to use up extras either way.
A Family Tradition From Jim’s Cousin Pete
Canning hot peppers the Italian way is one of our most-loved family traditions. This recipe comes straight from Jim’s second cousin Pete, whose real name is actually John, though everyone just calls him Pete. He’s a passionate gardener with an equal passion for canning, and he generously passed this recipe down to us years ago. Once he walked Jim through his exact method, we’ve been canning our own batch of Pete’s peppers together every summer since.
If you’ve never tried home canning before, this is the perfect place to start. The process is simple, the ingredients are basic, and the reward is jars of pickled peppers that last all winter long.
Find all my top 5 canning recipes here: 5 Basic Garden Canning Recipes.
Why You’ll Love This Recipe
- Beginner-friendly: no special skills needed, just basic water bath canning
- Adjustable heat: make the peppers as mild or as spicy as your family likes
- Long shelf life: sealed jars keep in the pantry for up to two years
- So versatile: enjoy them on hot dogs, in omelets, on toast, or with grilled meats
- A real family recipe: passed down from Jim’s cousin Pete and tested for years
Ways to Enjoy Pete’s Peppers
Use a mix of sweet and hot peppers depending on how much spice you want. Then enjoy them:
- As a flavorful side dish
- As a condiment for sandwiches or burgers
- Added to a charcuterie board
- Piled on toast for a simple meal
- Alongside grilled meats like steak, chicken, or sausage for a punch of spice and sweetness

This post contains some affiliate links for your convenience (which means if you make a purchase after clicking a link, I will earn a small commission which helps keep my blog up and running but it won’t cost you a penny more)! Click here to read my full disclosure policy.
Supplies You Will Need:
- Home Canning Jars (I recommend the wide mouth for this recipe)
- Canning Jar Lids & Bands (If you are using pre-used jars)
- Canning Funnel
- Canning Enamel Pot with Rack (Best price on a large pot with all the supplies)
- Secure Grip Jar Lifter (Must Have!)
- Pot Holders
- Hot Pad for your Counter
- Good Seasons Italian Salad Dressing & Recipe Mix
Ingredients for 9 Pint Jars of Italian Hot Pepper:
- 2 large gallons of Vinegar
- 1/2 cup of Salt
- 1 Peck of Mild Sweet Peppers
- 1/2 Peck Hot Peppers
- 2 cups of Extra Virgin Olive Oil
- 2 cups Canola Oil
- 2 envelopes of Good Seasons Salad Dressing, the dry mix
- 1 large head of Garlic
How to Make Italian Canned Pickled Hot Peppers
- Gather your variety of sweet and hot peppers (see the ingredient list above), white vinegar, garlic, salt, Good Seasons Italian dry dressing mix, canola oil, and extra-virgin olive oil.
- You’ll also need pint jars, lids, and bands.
- Run the jars, lids, and bands through the dishwasher to sanitize them, and keep everything as clean as possible throughout the process.
- No garden peppers this year? Your local farmers market will have everything you need.
- Wash the peppers in cold water, remove the seeds, and cut off the tops. Wear gloves and avoid touching your face or eyes; the oil from hot peppers can really sting.
- Want extra spice? Leave a few seeds in the hot peppers.
- Slice the peppers thin using a food processor.
- Add the sliced peppers to a large pot or plastic container.
- Pour in enough white vinegar to cover all the peppers completely.
- Stir in 1/2 cup of canning salt. (Pete always told us to use “a good amount” of salt!)
- Cover and let sit on the counter for at least 24 hours.
- The next day, have your sterilized pint jars, lids, and bands ready to go.
- Drain the peppers and rinse with cold water.
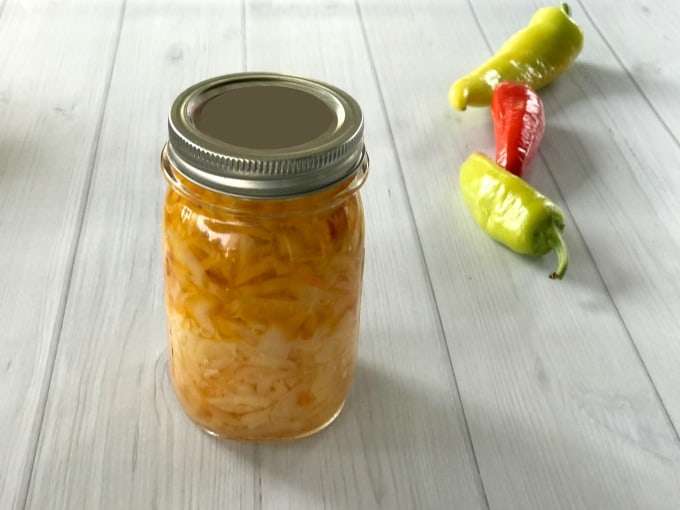
- Pack each jar full and tight with the sliced peppers.
- Mix 2 cups of canola oil and 2 cups of olive oil together in a large measuring cup.
- For each jar: add 1/2 teaspoon of Good Seasons dry Italian dressing mix and 1/2 clove of garlic, then fill with the oil mixture, leaving 1/4 inch of headspace at the top. Wipe the rim clean with a paper towel.
- Tap each jar lightly to release any air bubbles.
- Seal the jars with the lids and bands.
- Process the jars in a boiling water bath for 20 minutes.
- Remove the jars with a jar lifter and set them on a towel-covered hot pad to cool.
- By the next morning, the lids should have popped down to seal. Any jar that didn’t seal (the lid still flexes when pressed) should go in the fridge and be eaten within 2 weeks.
Variations
- Spicier: use more hot peppers and fewer sweet ones, or leave extra seeds in for more heat
- Milder: lean heavier on sweet peppers and remove all the seeds
- Different peppers: banana peppers, jalapeños, or Hungarian wax peppers all work well in this recipe
- Mixed jar: add a few cauliflower florets or carrot sticks along with the peppers for a colorful, crunchy mix
- Herb boost: tuck a sprig of fresh oregano or basil into each jar before sealing
Susan’s Tips and Tricks
- Wear gloves. Hot pepper oils linger on your hands long after you’ve finished slicing, so protect yourself from the start.
- Don’t rush the soak. A full 24 hours on the counter is what gives these peppers their flavor, so resist the urge to skip ahead.
- Use wide-mouth jars. They make packing the peppers so much easier than regular-mouth jars.
- Check your seals the next morning. Any jar that didn’t pop should go straight in the fridge and be eaten within two weeks.
- When in doubt on salt, go generous. Pete always said “a good amount,” and that’s really all the guidance you need.

Frequently Asked Questions
A: When processed correctly in a water bath canner, sealed jars will keep in a cool, dark pantry for up to two years. Once opened, store them in the fridge and enjoy within a few weeks.
A: Yes! The spice level is entirely up to you. Use more sweet peppers and fewer hot peppers for a milder jar, or load up on hot peppers if you like more heat.
A: You don’t have to process them at all. Skip the water bath canning step and store the jars in the refrigerator instead. They’ll be ready to eat in a few days.
A: Listen for the “pop” within a few hours of removing jars from the water bath. After 24 hours, press the center of the lid. If it doesn’t flex up and down, it’s sealed. If it does flex, refrigerate that jar and eat it within two weeks.
A: Yes! Garden peppers are wonderful, but store-bought or farmers market peppers work perfectly in this recipe too.

Italian Canned Pickled Hot Peppers
Our family’s favorite way to preserve garden peppers is a simple water bath canning recipe with adjustable spice, ready to enjoy on hot dogs, omelets, or anything that needs a kick.
- Total Time: 1 day 50 hours
- Yield: 9 pint jars 1x
Ingredients
- 9 pint Jars
- 2 large gallons of Vinegar
- 1/2 cup of Salt
- 1 Peck of Mild Sweet Peppers
- 1/2 Peck Hot Peppers
- 2 cups of Extra Virgin Olive Oil
- 2 cups Canola Oil
- 2 envelopes of Good Seasons Salad Dressing, the dry mix
- 1 large head of Garlic
Instructions
- You will need a variety of peppers: sweet banana peppers, 1/3 of the total amount of hot Hungarian peppers, two sweet bell peppers, red or green peppers, white vinegar, garlic cloves, table salt, or sea salt, Good Seasons Italian dry salad dressing, canola oil, and extra-virgin olive oil,
- You will also need pint jars, jar lids, and jar rims (bands).
- Make sure that the jars, jar lids, and jar rims are standardized in the dishwasher, and keep them as clean as possible during this process.
- If you do not have a garden or did not get enough hot peppers this year, you can get all the ingredients at the local farmers market.
- Harvest the peppers, wash peppers in cold water, clean out the seeds, and cut off the tops. Make sure to wear gloves and do not touch your face or eyes, as the oil from the hot peppers can be very uncomfortable.
- If you want your peppers to be a little spicy, leave a few of the seeds from the hot peppers.
- Slice peppers in a food processor to get thin slices.
- Add the sliced peppers to a large pot or plastic container.
- Add enough white vinegar until all the peppers are covered with the white vinegar.
- Add 1/2 cup of canning salt and mix. (Pete told up “a good amount” of salt)
- Cover the pot or container and let sit out on the counter for 24 hours at a minimum.
- The next day, have sterilized canning pint jars, lids, and rims ready.
- Drain the peppers that soaked overnight and rinse with cold water.
- In each jar, add the sliced peppers and pack the peppers full and tight.
- Mix 2 cups of canola oil and 2 cups of virgin olive oil together in a 4-cup measuring cup.
- For each pint jar:
- Add 1/2 teaspoon of Good Seasons dry Italian salad dressing.
- Add 1/2 clove of garlic.
- Fill the jars with the olive oil and canola oil mixture, leaving 1/4 inch at the top.
- Clean the tips of the jars with a paper towel.
- Tap lightly on each jar to make sure that all the air bubbles are removed.
- Seal the jars with the lids and rims.
- Please the jars in a boiling water bath canner and water bath for 20 minutes.
- Remove the jars from the water bath with the Ball Sure Grip Jar Lifter and cover them with a towel on a protective hot pad.
- The jar lids will pop by the next morning to ensure that they are sealed. Any jar that does not pop, or does not move up and down when pressed, did not seal and should be refrigerated and eaten in 2 weeks.
Notes
- The recipe was updated on 7-12-2024 to be more detailed for beginner canners.
- Pete always said to use “a good amount” of salt — trust your instincts! Sealed jars keep in the pantry for up to 2 years. Any jar that doesn’t seal should go in the fridge and be eaten within 2 weeks.
- Prep Time: 1 hour
- Cook Time: 30
- Category: Side Dish
- Method: Canning
- Cuisine: Italian
Nutrition
- Serving Size: 1 tbsp
- Calories: 60
- Sugar: 0.5 g
- Sodium: 168.9 mg
- Fat: 3 g
- Carbohydrates: 8.4 g
- Fiber: 3.1 g
- Protein: 1.4 g
- Cholesterol: 0 mg


Your recipe made the think about what I can do when my peppers start coming in. This year for the first time I didn’t plant a banana pepper plant. I went with bell, jalapeno and Anaheim, but maybe I can figure out something for a pickled combo using those. – Margy
This looks awesome!Thanks for linking up with us today the To Grandma’s House you go link party 🙂 Pinned!
Thanks for sharing the recipe. I have pinned it to my canning board. We grow a large variety of peppers every year and this will be a good recipe to try.