Chocolate Covered Oreo Christmas Ornaments Easy No-Bake Cookies

Chocolate-covered Oreo Christmas ornaments are an easy no-bake Christmas cookie, and these ones are decorated to look like little hanging ornaments. Each Oreo gets dipped in melted chocolate, covered in sprinkles, and topped with a mini peanut butter cup for the cap.

Every Christmas, everybody wants to grab the decorated Christmas Oreos in the store. But these regular Oreos, dressed up as fancy Oreo Christmas cookies, will be the first ones to disappear on any cookie tray.
Kids can help, too. This chocolate-covered Oreo ornament recipe is one of the easiest Oreo Christmas treats for little hands, because older kids can do the dipping and the little ones can take over the decorating.
Our Family Tradition of Making Christmas Cookies
One of my favorite things about Christmas has always been making cookies with my mother. She made the most delicious cutout cookies. Many of our original cookie cutters were made by my dad himself, out of strips of metal.
That is a fond memory I have carried with me all these years.
When I had my own kids, we always made Christmas cookies too. I even made cutout cookies for every holiday, because the memory meant so much to me.
We would either top them with sprinkles or frost and decorate them. We started doing this at Thanksgiving, too. That way we had cookies for Thanksgiving, and then we made more for Christmas.
Then our family grew.
When my oldest daughter had our first granddaughter, we started going to her house for a Christmas baking party. Christene, Katie, Joey, and the two granddaughters, Nova and Rory, all join in.
We play Christmas music and make cookies together, and we always have such a great time. It gets us into the spirit of the season and the birth of Christ.
This Christmas, I wanted to find a fun cooking craft to make with my granddaughters.
Some of our favorite cookies to make together are my soft cut-out sugar cookies, my soft gingerbread cut-out cookies, and my snowball cookies with pecans. These chocolate-dipped Oreos for Christmas are a fun, interactive way for the preschoolers and toddlers to get really involved in the cooking.
No-bake Christmas cookies mean my three-year-old granddaughter can be a bigger part of the cookie making. There is no hot oven, so she can jump right in.

Why You’ll Love These Chocolate-Covered Oreo Christmas Ornaments
- Easy no-bake Christmas cookies with only a few ingredients.
- Everybody loves Christmas Oreos.
- Kid-friendly, with little hands helping to decorate.
- A fun, interactive way for preschoolers and toddlers to get involved in the cooking.
- Perfect for a Christmas party, Christmas Eve dessert, a cookie tray, or cookies for Santa.
- Red, green, white, and dark chocolate make a colorful holiday tray of chocolate-covered Oreos for Christmas.
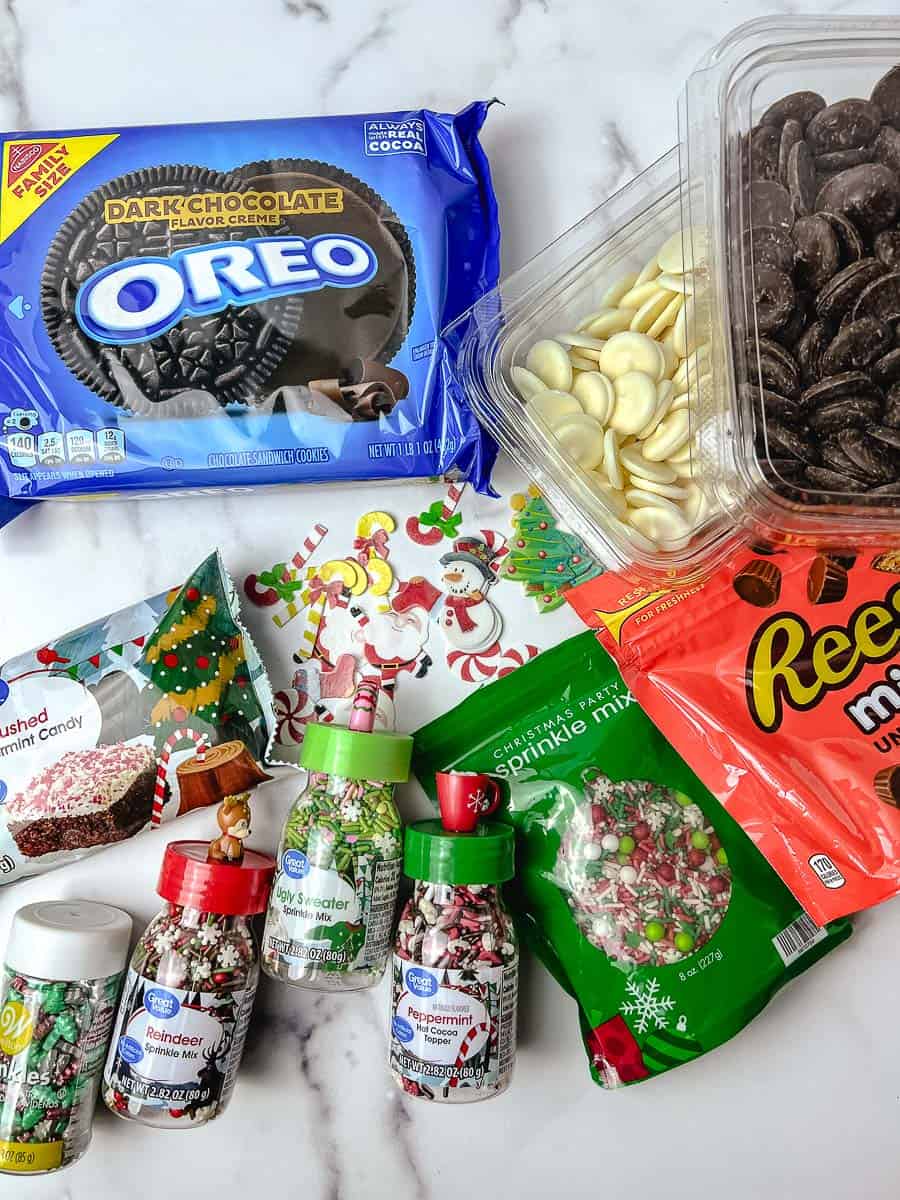
Ingredients You’ll Need
- 12 Oreo cookies
- 4 cups white melting wafers, divided into 3 bowls (2 cups left white, 1 cup tinted red, 1 cup tinted green)
- 2 cups dark chocolate melting wafers
- Red and green oil-based candy coloring, organic or natural if you can find it (or red and green melting wafers)
- 3 teaspoons coconut oil (1 teaspoon for the white wafers, 1 for the dark wafers, and 1 for the red and green wafers)
- Christmas sprinkles
- 12 mini peanut butter cups, unwrapped
Ingredient Notes and Substitutions
- Oreos: Regular Oreos work great for making Christmas Oreos. You also have the option to use Double Stuf.
- Melting wafers: These melt smooth and set firm, which makes them easy to work with. Candy melts work too.
- Candy coloring: Use an oil-based candy coloring, because regular liquid food coloring can make white chocolate thick and lumpy. If you can, look for an organic or natural one.
- Coconut oil: Stir 1 teaspoon into the white wafers, 1 teaspoon into the dark wafers, and 1 teaspoon into the wafers you tint red and green. It makes the chocolate smooth and shiny.
- Peanut butter cups: If you need a nut-free option, use Rolos for the ornament cap instead.
- Sprinkles: Any Christmas sprinkles will do. Pick red, green, and white to match your chocolate.
This post contains some affiliate links, for your convenience (which means if you make a purchase after clicking a link, I will earn a small commission, which helps keep my blog up and running, but it won’t cost you a penny more)! Click here to read my full disclosure policy.
Equipment Needed
- 4 microwave-safe bowls
- A regular fork
- A butter knife
- Parchment paper
- A cookie tray with a rim
How to Make Chocolate-Covered Oreo Christmas Ornaments
- Set Up Your Tray: Line a cookie tray with parchment paper.
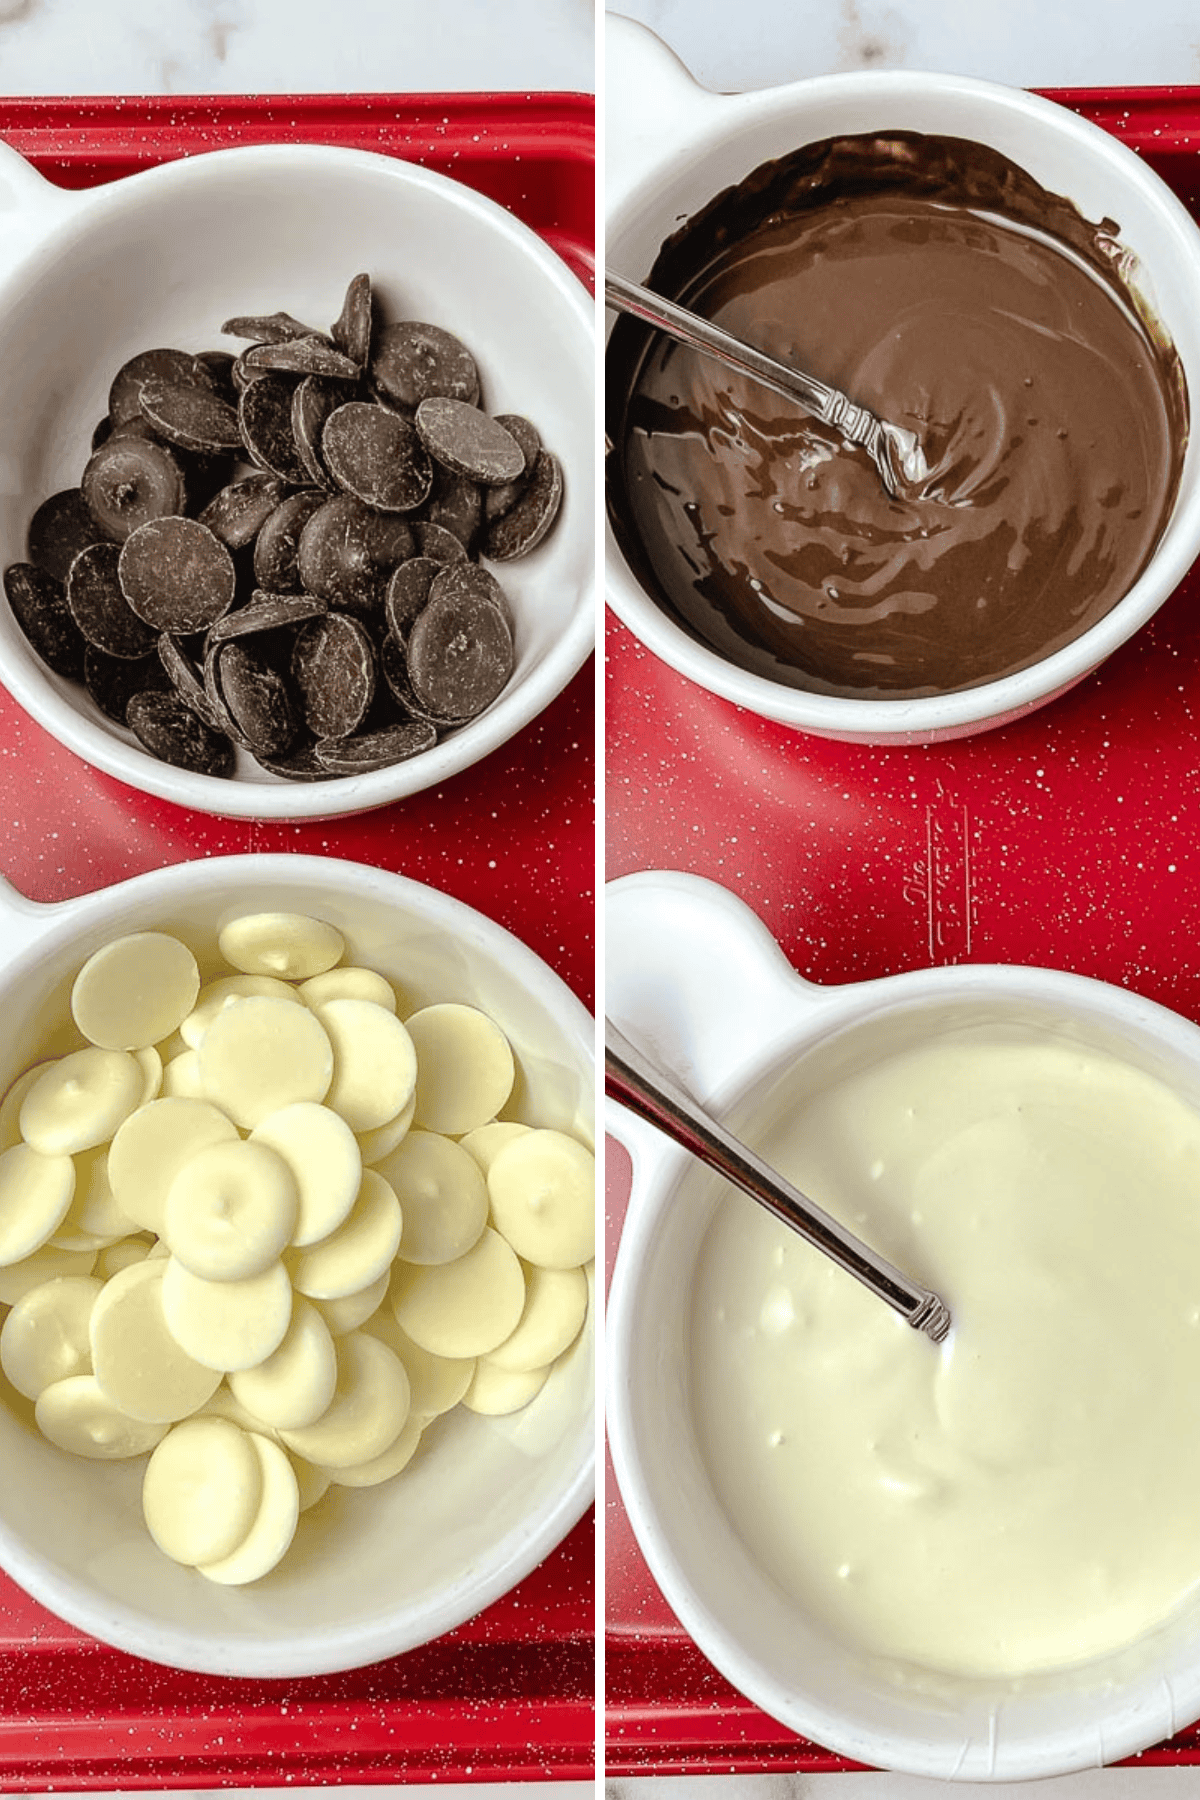
Pro tip: A tray with a rim helps hold the sprinkles, because the little ones may send them flying. - Melt the Wafers: Divide the white wafers into three bowls, 2 cups in one bowl and 1 cup in each of the other two. Put the dark chocolate wafers in the fourth bowl. Stir 1 teaspoon of coconut oil into the white wafers, 1 teaspoon into the dark wafers, and 1/2 teaspoon into each of the red and green bowls. Melt each bowl until smooth and shiny. Then stir red coloring into one of the 1 cup bowls and green into the other, and leave the 2 cups white.
Pro tip: Melt in short bursts and stir between each one so the chocolate does not scorch. - Dip the Oreos: Push a regular fork into the middle of an Oreo and dip it into the melted chocolate until it is covered. Tap off the extra, then set it on the parchment. Slide a butter knife under the cookie to ease the fork out.
- Add the Sprinkles: Shake on the sprinkles while the chocolate is still wet. This is the best job for the kids.
- Attach the Ornament Cap: Press a mini peanut butter cup onto the top of each Oreo while the chocolate is still wet. The chocolate holds it in place as it sets.
- Let Them Set: Leave the cookies on the tray until the chocolate is firm.
- Serve: Arrange the chocolate-covered Oreo ornaments on a platter for your Christmas party, or pack a few up for Santa.
Tips and Tricks
- Have lots of paper towels, spoons, forks, and knives ready before you start.
- Work quickly with the sprinkles and caps, because they need to go on before the chocolate sets.
- Keep the melted chocolate warm and smooth by reheating it for a few seconds if it starts to thicken.
- Let the kids pick which sprinkles go on which Christmas Oreos.
- If you have too much chocolate on the side of a cookie, break it off. Then warm a spoon on your stove and rub the back of the spoon along the chocolate to smooth it out.
- An adult should handle the melting, since the bowls get hot.
- Cleanup: If the chocolate has hardened in the bowls, reheat it until it is liquid again. Then wipe it out with paper towels and put them in the trash. Do not rinse melted chocolate down the sink, because it can harden in your pipes.

Variations
- Nut-free: Swap the peanut butter cups for Rolos.
- Peppermint: Use crushed candy cane in place of the sprinkles.
- Golden: Try Golden Oreos in place of the classic chocolate ones.
- All white: Dip every cookie in white chocolate for a snowy look.
- Looking for Christmas Oreo balls? These are whole dipped Oreos, not rolled Oreo balls.
More Easy Christmas Cookie Recipes to Try This Season
- Best Soft Cut Out Sugar Cookie Recipe for Christmas
- Soft Gingerbread Cutout Cookies
- Easy Snowball Cookies with Pecans
- Christmas Spritz Cookies
- Ginger Molasses Christmas Cookies
- 20 of Our Best Christmas Cookies
How Long Do Chocolate-Covered Oreos Last?
Chocolate-covered Oreos last about a week when you store them in an airtight container in a cool spot. Place parchment between the layers so the sprinkles stay put.

Frequently Asked Questions
Yes. Older kids can help with the dipping, and the little ones can do the sprinkles and the ornament caps. An adult should handle the melting.
Melting wafers are the easiest, because they melt smooth and set firm. Candy melts work too.
Set the cookies on parchment in a cookie tray with a rim. The rim catches the sprinkles that bounce off.
Yes. Make them a day or two ahead and keep them in an airtight container until you are ready to serve.
About a week in an airtight container in a cool spot. Put parchment between the layers so the sprinkles stay put.

Chocolate Covered Oreo Christmas Ornaments
Easy no-bake chocolate-covered Oreo Christmas ornaments decorated with sprinkles and a mini peanut butter cup on top. A fun cookie for kids to help make.
- Total Time: 50 minutes
- Yield: 12 cookies 1x
Ingredients
- 12 Oreo cookies
- 4 cups white melting wafers, divided into 3 bowls (2 cups left white, 1 cup tinted red, 1 cup tinted green)
- 2 cups dark chocolate melting wafers
- Red and green oil-based candy coloring, organic or natural if you can find it (or red and green melting wafers)
- Christmas sprinkles
- 12 mini peanut butter cups, unwrapped
- 3 teaspoons coconut oil (1 teaspoon for the white wafers, 1 for the dark wafers, and 1 for the red and green wafers)
 Get Recipe Ingredients
Instructions
- Line a cookie tray with parchment paper.
- Divide the white wafers into three bowls, 2 cups in one bowl and 1 cup in each of the other two. Put the dark chocolate wafers in the fourth bowl. Stir 1 teaspoon of coconut oil into the white wafers, 1 teaspoon into the dark wafers, and 1/2 teaspoon into each of the red and green bowls. Melt each bowl until smooth and shiny, stirring between short bursts. Then stir red coloring into one of the 1 cup bowls and green into the other, and leave the 2 cups white.
- Push a regular fork into the middle of an Oreo and dip it into the melted chocolate until covered. Tap off the extra and set it on the parchment, using a knife to ease the fork out.
- Add sprinkles while the chocolate is still wet. Press a mini peanut butter cup onto the top of each Oreo.
- Let the cookies set until the chocolate is firm.
Notes
1. Set the cookies on parchment in a cookie tray with a rim to catch the sprinkles.
2. Use Rolos instead of peanut butter cups for a nut-free option.
3. Melt the wafers in short bursts and stir between each one so the chocolate does not scorch.
4. Use an oil-based candy coloring, organic or natural if you can find it, because regular liquid food coloring can make white chocolate thick and lumpy.
5. Have paper towels, spoons, forks, and knives ready before you start.
6. If there is too much chocolate on the side of a cookie, break it off. Warm a spoon on the stove and rub the back of it along the chocolate to smooth it out.
7. For cleanup, reheat any hardened chocolate in the bowls until it is liquid, wipe it out with paper towels, and put them in the trash. Do not rinse chocolate down the sink.
8. Store in an airtight container in a cool spot for about a week.
9. Stir 1 teaspoon of coconut oil into the white wafers, 1 teaspoon into the dark wafers, and 1/2 teaspoon into each of the red and green bowls before melting. It makes the chocolate smooth and shiny.
- Prep Time: 20 minutes
- Cook Time: 0 minutes
- Category: Dessert
- Method: No bake
- Cuisine: American