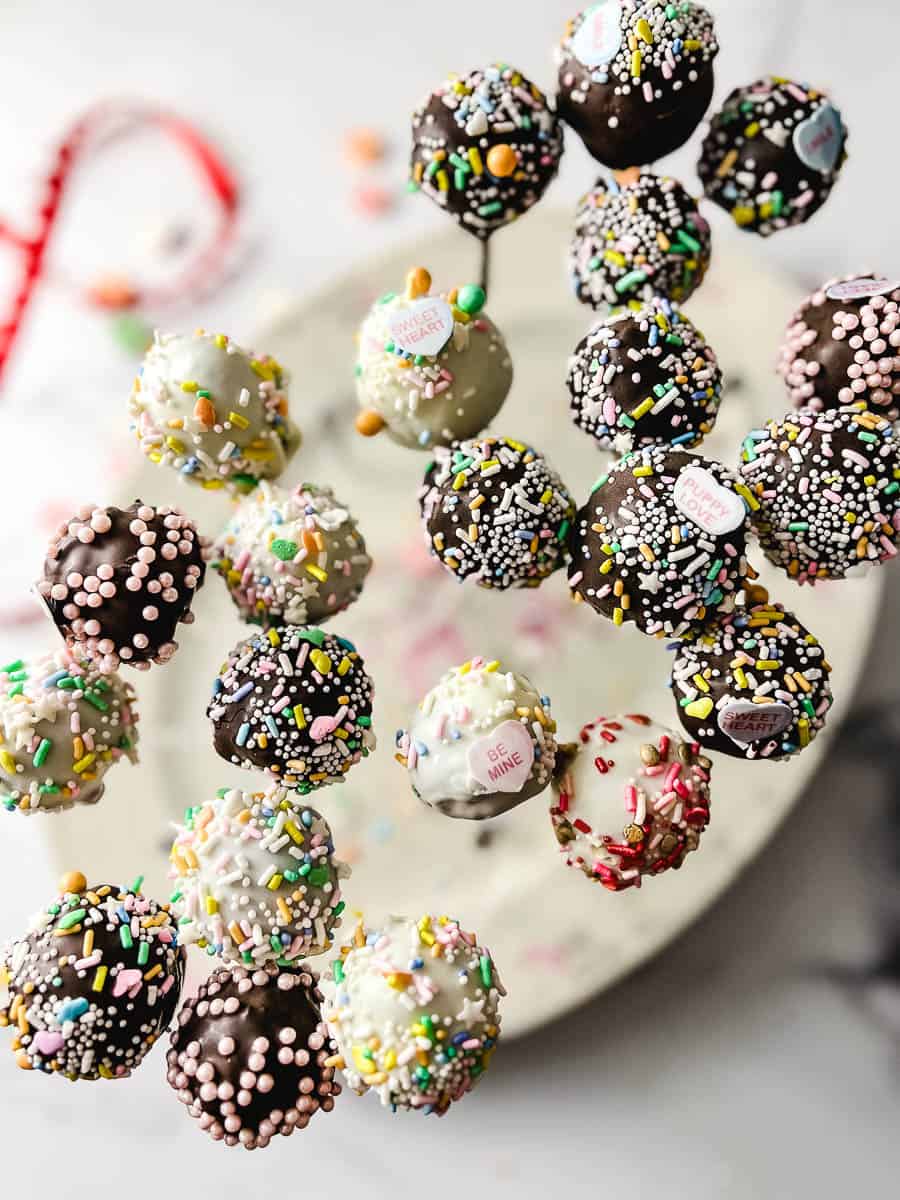
Easy Red Velvet Cake Pops From Cake Mix
Do you see cake pops at Starbucks and think I could make them for less but think it is too complicated? You can make delicious easy cake pops from a cake mix that will save you time and money. Get the family together and made easy red velvet cake pops from cake mix any time of the year but especially at Valentine’s

You can easily make delicious cake pops from a cake mix at home, saving both time and money compared to buying them at Starbucks. Cake pops can be made in any flavor but I wanted to make them for Valentine’s day with an easy red velvet cake mix. My go-to box cake mix is Duncan Hines and it turns out moist and perfect every time.
Making cake pops with kids on Valentine’s Day can be a fun and enjoyable activity for the whole family. Not only is it a great way to bond with your children and create sweet treats together, but it also allows them to be creative and express themselves through decorating.
Plus, they can take pride in their finished product and share them with their friends and loved ones. We took these cute ones to our monthly friend’s party and they disappeared.
It’s an activity that is easy to do at home with simple ingredients and equipment, and the end result is a tasty and beautiful treat that everyone will love. So why not make it a tradition and spend some quality time making cake pops with your kids on Valentine’s Day?

You may also be interested in making for Valentine’s Day: Red Velvet Heart Cake Mix Cut Out Cookies

Tips for Making Cake Pops from a Cake Mix
- Cool the cake completely before you start to make the cake pops. To make the whole process less tiring you can make the cake the day ahead.
- Start with a very large bowl and the crumbled cake will be larger than you think.
- Make sure to use the correct amount of frosting. I know we all do not like to waste food but adding a whole pre-made frosting will be too much for one cake mix.
- Make sure when forming the balls of cake and frosting to refrigerate them for at least 2 hours. I make mine 2 days ahead of coating and put them in the freezer, then put them in the fridge the night before I was going to dip them.
- The cake pop balls have to be on the cold side to get the chocolate to set and not drip down the stick. I put my chilled in the fridge cake balls in the freezer for about 1 minute and that worked best for me.
- You need to make sure you are using melting chocolate wafers for the coating. These will work the best to get the right consistency. If the chocolate is too thick the cake pops are to big and if it is too thin it will just slide off. You can add a little at a time of vegetable oil or coconut oil if the chocolate is too thick.
- Make sure that you do not get any water in the chocolate when you melt it. The measuring cup, any spoon for mixing and your hands have to be completely dry. Any water will seize the chocolate and you have to toss it and start over.
- A must is a cake pop stand. That way you do not have to have a flat side of your finished cake pop.
Note this post contains some affiliate links for your convenience (which means if you make a purchase after clicking a link I will earn a small commission which helps keep my blog up and running but it won’t cost you a penny more)! Click here to read my full disclosure policy.

What You Need to Make Cake Pops With a Cake Mix
- 1 Duncan Hines Perfectly Moist Red Velvet Cake Mix
- 1 cup of water
- 3 large eggs
- 1/2 cup of melted butter
- 1 cup of Duncan Hines Creamy Home Style Dark Chocolate Fudge Frosting
- Ghirardelli Melting Wafers Variety Pack with Ghirardelli White Chocolate Melting Wafers and Ghirardelli Dark Chocolate Melting Wafers. (You will need 2 of each or at least 2 of the chocolate)
- Cake Pop Stand
- Clear Acrylic Cake Pop Sticks (I think the clear is a pretty presentation and you can reuse them)
- 13×9 Cake Pan
- Large Mixing Bowl
- 1 tablespoon measuring spoon (this worked the best for me, not a cookie dough scoop)
- Pyrex -2 Prepware 2 Glass Measuring Cup
- Long handle Ice Tea Spoons
- A medium block of Styrofoam to hold the cake pops while you are dipping in the chocolate, any kind will do this is just an example.
- Sprinkles
How to Make Cake Pops with a Box Cake Mix
- Preheat the oven to 350°.
- In a stand mixer or a hand mixer make the cake mix according to the package instructions for a 9×13-inch pan.
- Bake the cake at 350° for 25 to 29 minutes or until a toothpick comes out clean but do not overbake.
- Once the cake is completely cool, crumble it into a large bowl.
- Mix in 1 cup of prepared chocolate frosting. This step will take about 5 minutes but do not overmix.
- With a 1-tablespoon measuring spoon shape the mixture into small balls about 1 1/2 inches in diameter. Place in a container in a single layer and refrigerate for 2 hours.
- Melt the melting wafers. in a pyrex measuring cup in the microwave for 30 seconds at a time until fully melted. Stir about every minute. Melt the dark chocolate in one cup and the white chocolate in another cup.
- If the Chocolate is not thin enough add a teaspoon at a time of vegetable oil or coconut oil to thin out the chocolate.
- Before you start coating the cake pops have everything set out and ready. Have the wafers in the measuring cups, have the cake stand ready to fill, have a styrofoam block next to the dipping area to rest the cake pops if needed as you go, and have any sprinkles in bowls with spoons.
- Dip the end of the cake pop stick in a little of the melted chocolate and insert it in the cake pops most of the way in and return to the fridge.
- When all the pops on sticks take them out one at a time and dip them into the melted chocolate, making sure to fully coat the cake pop. Tap the stick on the side of the cup to let any excess chocolate drip off.
- Bonus Tip: I found that if I put the cake pops before dipping them in the freezer for about one minute the chocolate did not drip as much. Also, put part of a block of styrofoam in the freezer and set the dipped pop in the freezer again for less than a minute so that the chocolate hardened and did not drip down the stick.
- Right after you have the cake pop coated in chocolate (dark or white) add the sprinkles to the wet chocolate. You can not add the sprinkles after the chocolate has hardened.
- Inset the finished cake pop in the cake pop stand.
What Chocolate To Use for the Coating
When making cake pops, use only chocolate that is specifically formulated for melting and dipping. The best options are candy melts or chocolate wafers. These types of chocolate have a lower melting point and will remain smooth and stable when melted, making them ideal for coating cake pops.

Easy Cake Pop Decorating for Easy Red Velvet Cake Pops From Cake Mix
I have found an easy way to decorate it use sprinkles after you dip the pops in chocolate. It gives the cake pops a special look and is easy to have little ones help you.
You can also take the opposite color of chocolate and drizzle it across the pop when the coating has hardened. It is easy to just add melted chocolate to a good-quality plastic zip-top bag and cut a small hole in the corner.

How to Display Cake Pops
There are several ways to display cake pops, depending on the occasion and setting. Here are a few ideas:
- Cake pop stand: A cake pop stand is a great way to display cake pops at a party or event. These stands come in a variety of sizes and styles and can hold multiple cake pops at once.
- Styrofoam block: A Styrofoam block can be used as a base to hold cake pops upright. Simply poke the cake pop sticks into the block and arrange them in a pleasing display.
- Tiered platters: Tiered platters are a great way to display cake pops in a more elegant setting. Stack the platters to create a tiered look and arrange the cake pops on each platter.
- Cellophane bags: Cake pops can be wrapped in clear cellophane bags and tied with a ribbon or twist tie. This is a great option for gifting or for displaying on a dessert table.
- Personalized Box: You can also display cake pops in a personalized box, this is a great option for gifting or for displaying on a dessert table.
What Sticks to Use of Cake Pops
- My favorite is the clear acrylic cake pop stick.
- Paper cake pop sticks are the most popular.
- You can also just leave them as a ball on a platter or on top of a cake
How to Store Easy Red Velvet Cake Pops From Cake Mix
Cake pops should be stored in an airtight container to keep them fresh and prevent them from drying out. Here are a few tips for storing cake pops:
- Room temperature: Cake pops can be stored at room temperature for up to 2 days, as long as they are in an airtight container.
- Refrigeration: Cake pops can also be stored in the refrigerator for up to a week. Make sure they are in an airtight container to prevent them from absorbing any odors from the fridge.
- Freezing: Cake pops can also be frozen for up to 3 months. Place them in an airtight container or freezer bag and make sure to remove as much air as possible.
Can Cake Pops Be Frozen?
Cake pops can be frozen. Freezing can be an excellent way to extend the shelf life of your cake pops, preserving them for up to 3 months.
- Allow the chocolate to set completely before freezing
- Put the cake pop in an airtight container or freezer bag and make sure to remove as much air as possible.
- When you are ready to eat the frozen cake pops, let them set out at room temperature for 30 minutes or in the fridge overnight.

Easy Red Velvet Cake Pops From Cake Mix
Indulge in the rich, velvety goodness of our homemade red velvet cake pops. Made with a convenient cake mix, these treats are the perfect combination of moist, fluffy cake and chocolate frosting, all rolled into a bite-sized pop. Perfect for parties, gifts, or just a sweet treat for yourself, our red velvet cake pops are sure to be a crowd-pleaser for any Valentine’s Day Dinner.
- Total Time: 55 minutes
- Yield: 30 1x
Ingredients
- 1 Duncan Hines Perfectly Moist Red Velvet Cake Mix
- 1 cup of water
- 3 large eggs
- 1/2 cup of melted butter
- 1 cup of Duncan Hines Dark Chocolate Frosting
- Ghirardelli Melting Wafers Dark Chocolate and White Chocolate
- Vegetable Oil or Coconut Oil if need to thin the chocolate for dipping
Tools Needed:
Instructions
-
- Preheat the oven to 350°.
- In a stand mixer or a hand mixer make the cake mix according to the package instructions for a 9×13-inch pan.
- Bake the cake at 350° for 25 to 29 minutes or until a toothpick comes out clean but do not overbake.
- Once the cake is cooled completely, crumble it into a large bowl.
- Mix in 1 cup of prepared chocolate frosting. This step will take about 5 minutes but do not overmix.
- With a 1-tablespoon measuring spoon shape the mixture into small balls about 1 1/2 inches in diameter. Place in a container in a single layer and refrigerate for 2 hours.
- Melt the melting wafers in a pyrex measuring cup in the microwave for 30 seconds at a time until fully melted. Stir about every minute. Melt the dark chocolate in one cup and the white chocolate in another cup.
- If the Chocolate is not thin enough add a teaspoon at a time of vegetable oil or coconut oil to thin out the chocolate.
- Before you start coating the cake pops have everything set out and ready. Have the wafers in the measuring cups, have the cake stand ready to fill, have a styrofoam block next to the dipping area to rest the cake pops if needed as you go, and have any sprinkles in bowls with spoons.
- Dip the end of the cake pop stick in a little of the melted chocolate and insert it in the cake pops most of the way in and return to the fridge.
- When all the pops on sticks take them out one at a time and dip them into the melted chocolate, making sure to fully coat the cake pop. Tap the stick on the side of the cup to let any excess chocolate drip off.
- Bonus Tip: I found that if I put the cake pops before dipping them in the freezer for about one minute the chocolate did not drip as much. Also, put part of a block of styrofoam in the freezer and set the dipped pop in the freezer again for less than a minute so that the chocolate hardens and did not drip down the stick.
- Right after you have the cake pop coated in chocolate (dark or white) add the sprinkles to the wet chocolate. You can not add the sprinkles after the chocolate has hardened.
- Inset the finished cake pop in the cake pop stand.
- Prep Time: 30 minutes
- Cook Time: 25 minutes
- Category: Dessert
- Method: Baking
Nutrition
- Serving Size: 1 cake pop
- Calories: 105
- Sugar: 10.4 g
- Sodium: 45.8 mg
- Fat: 6.2 g
- Carbohydrates: 11.7 g
- Fiber: 0 g
- Protein: 0.7 g
- Cholesterol: 26.7 mg