Easy Flaky Pie Crust Recipe Without a Food
Updated May 11, 2026
This easy pie crust recipe is the only one you will ever need. If you have a rolling pin, a pie pan, and a few simple ingredients, you can have a homemade, flaky, all-butter pie crust on the table in minutes. Apple pie, pumpkin pie, cherry pie, pot pie, this crust does it all.

I have been making this homemade pie crust recipe for years, through Thanksgiving, Christmas, and every holiday in between. It is the same recipe I learned from the women in my family, made completely by hand with a pastry cutter, no food processor needed.
The secret to a perfectly flaky pie crust is simple: cold butter and a light hand. Keep everything cold, do not overwork the dough, and you will have the flakiest, most buttery crust every single time.
Want This as a Free Printable for Your Kitchen?
Why You’ll Love This Pie Crust Recipe
- No food processor needed, just a bowl and a pastry cutter
- Only 4 simple ingredients you already have on hand
- Makes a full double crust, enough for a top and bottom layer
- Perfectly flaky, buttery layers every single time
- Works for sweet pies, savory pies, and pot pies alike
What Is a Homemade Pie Crust?
A homemade pie crust is a simple pastry dough made from all-purpose flour, cold butter or shortening, salt, and ice water. The fat is cut into the flour using a pastry cutter until the mixture resembles coarse crumbs, then cold water is added just until the dough holds together. The result is a flaky, tender, golden crust that is far better than anything you can buy at the store.

A Family Tradition of Homemade Pies
We make a lot of our family pie recipes at Thanksgiving & Christmas. Christmas is the time of year when the family gathers for many different holiday traditions.
Our family has always been active in our Church Christmas Pageant and Vespers music program. For both of these Christmas traditions, families provide food for a potluck or special coffee hour.
Many years in the past, the Women’s Guild would bring out the silver tea servers. Christmas cookies, punch, finger sandwiches, and Christmas pies were served on long tables. I always looked forward to these services and all the delicious homemade recipes.
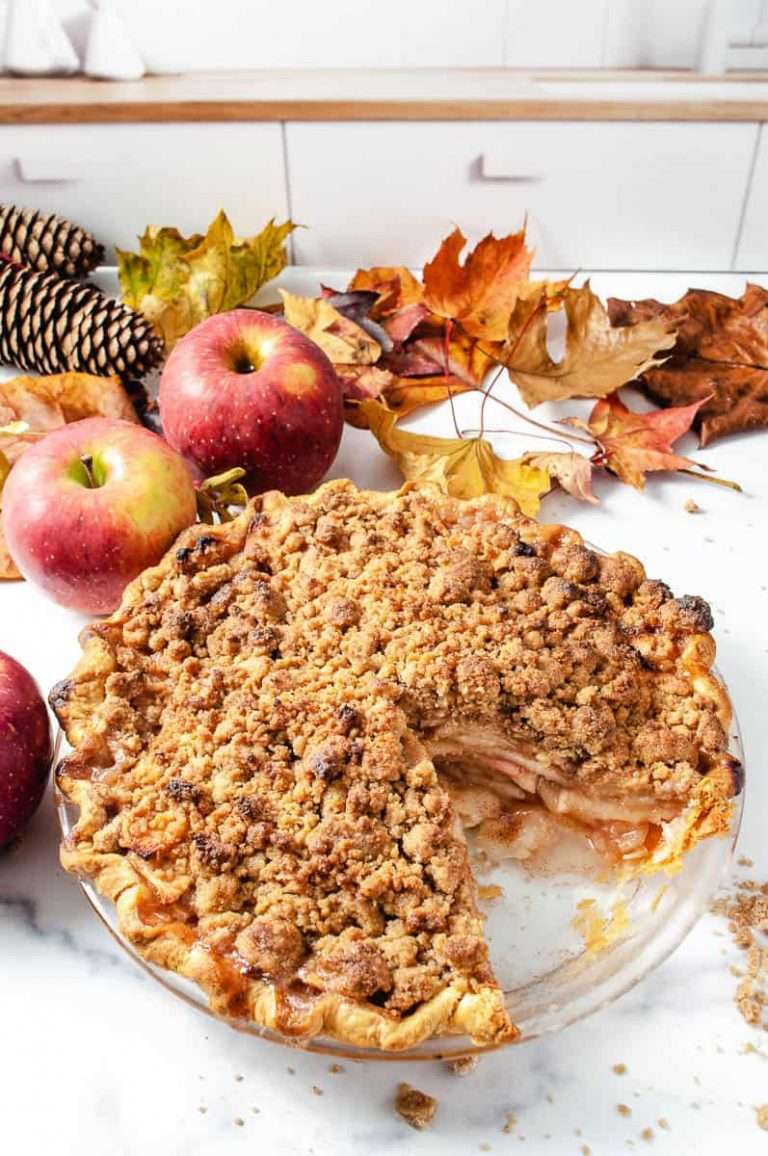
On most popular holidays, I like to bake pies, Pumpkin Pie and Apple Pie being the favorites in our home for years. Now, as the children are adults, Apple Pie is the pie that disappears first.
Ingredients for the Best Homemade Flaky Pie Crust
- All-purpose flour (spoon and level for accuracy)
- Kosher salt
- Unsalted butter, very cold, cut into small cubes (can also use shortening or half and half)
- Ice water, one tablespoon at a time
Ingredient tip: For a heart-healthier version, I also have a pie crust recipe made with olive oil.

- Here is the link to my post on American Homemade Apple Pie.
- Your family may also like Fresh Homemade Cherry Pie.
- And you do not want to have a June go by without making Fresh Strawberry Pie! Yum!
- If you need the recipe for a Traditional Pumpkin Pie you will find it here.
Note this post contains some affiliate links for your convenience (which means if you make a purchase after clicking a link, I will earn a small commission, which helps keep my blog up and running but it won’t cost you a penny more)! As an Amazon Associate, I earn from qualifying purchases. Click here to read my full disclosure policy.
Equipment Needed
- Pastry Cutter
- Rolling Pin
- Pie Pan
- Silicone Baking Pastry Dough Mat
- Large mixing bowl
How to Make Flaky Pie Crust by Hand (Step by Step)
- Chill the butter first. Cut the unsalted butter into small cubes and put them in the freezer for 10 minutes before you start. In the summer, I do this every single time. Pro tip: Cold butter is what creates those beautiful, flaky layers in your pie crust. Do not skip this step.
- Prepare your ice water. Fill a measuring cup with ice and pour in at least 6 tablespoons of cold water. Set it within reach before you start mixing. You want it cold the entire time you are working.
- Mix the flour and salt. Add the all-purpose flour and salt to a large bowl and stir them together with a fork until combined.
- Cut in the cold butter. Add the butter cubes to the flour and use the pastry cutter to work the butter in until the mixture looks like coarse cornmeal with a few pea-sized pieces of butter still visible. Those small butter pieces are what make the flakiest pie crust. Pro tip: Work quickly and do not overhandle the mixture. The more you handle it, the less flaky and tougher the crust will be.
- Add the ice water. Add the ice water one tablespoon at a time, stirring gently with a fork after each addition. Stop as soon as the dough just starts to come together. You may need slightly more or less than 6 tablespoons depending on the humidity in your kitchen.
- Divide the dough. Gently gather the dough and divide it into two equal halves. Each half makes one crust, so this recipe is perfect for a double-crust pie with both a top and bottom layer.
- Roll out the dough. On a lightly floured surface or silicone baking mat, flour your rolling pin and roll each half into a circle about 11 to 12 inches across, large enough to fit your pie pan with a little overhang around the edge.
- Transfer to the pie pan. Roll the dough gently onto your rolling pin, then lift and unroll it carefully into the pie pan. Gently press it into the bottom and sides without stretching it. Pro tip: Refrigerate the crust-lined pan for 10 minutes before adding your filling to help prevent a soggy bottom crust.
- Add your filling and top crust. Spoon your pie filling into the bottom crust, then lay the second crust gently on top. Trim any excess, seal and flute the edges, and vent the top with a few fork pokes or slits cut with a sharp knife.

How to Transfer Pie Crust to the Pie Pan
The easiest and safest way to transfer your rolled pie crust is to gently roll it loosely onto the rolling pin, then lift and unroll it directly over the pie pan. Everything about making a great pie crust is gentle and slow. Take your time, do not rush any step, and do not overwork the dough once it is rolled out.


How to Store and Freeze Pie Crust Dough
This homemade pie crust dough keeps well in the refrigerator for up to 3 days when each disc is wrapped tightly in plastic wrap.
You can also freeze it for up to one month. Shape each half into a flat disc before wrapping and freezing for the easiest thawing. To use, thaw the dough overnight in the refrigerator. Never thaw it on the counter since you want the butter to stay cold and firm for the flakiest results.
Variations and Substitutions
- All-shortening crust: Substitute all of the butter with vegetable shortening for a very tender, classic crust. This is the old-fashioned version many grandmothers used.
- Half butter, half shortening: Use half butter and half shortening for the best of both worlds, a crust that is both flavorful and wonderfully flaky.
- Olive oil crust: Substitute the butter with olive oil for a heart-healthier version. The texture is slightly crumblier but still delicious and simple to make.
- Salted butter: If you only have salted butter, use it and simply reduce or omit the added salt in the recipe.
- Single crust: If your recipe only needs a bottom crust, make just half of this recipe, or wrap and freeze the second half for your next pie.

What to Make With This Pie Crust
Once you have a reliable homemade pie crust recipe in your back pocket, the possibilities are endless. Here are our family’s favorites:
- American Homemade Apple Pie: The pie that disappears first at every gathering in our house
- Fresh Homemade Cherry Pie: A summer classic worth making every year
- Fresh Strawberry Pie: Do not let a June go by without making this one
- Traditional Pumpkin Pie: A holiday table is not complete without it

Susan’s Quick Tips for the Best Results
- Prep your ice water first. Have your measuring cup of ice water ready before you even touch the flour.
- Freeze the butter for 10 minutes before starting. This one step makes more difference in texture than anything else.
- Chill the bottom crust before filling. Once you press the dough into the pan, refrigerate it for at least 10 minutes while you prepare your filling. This helps keep the bottom from getting soggy.
- If you are making an apple pie, keep sliced apples in a bowl of cold water with 1/4 cup of lemon juice to prevent browning. Rinse off the lemon juice before adding the apples to the crust.
- Line a baking sheet with foil and set your pie on it before baking. This catches any drips and makes cleanup much easier.
Frequently Asked Questions
A: Yes! You can make this homemade pie crust up to 3 days ahead. Wrap each disc of dough tightly in plastic wrap and keep it in the refrigerator. You can also freeze it for up to one month and thaw overnight in the refrigerator before rolling.
A: The secret is cold butter and a light hand. Keep your butter and water as cold as possible, and work the dough as little as you can once the water is added. Overworking the dough develops the gluten and turns a flaky pie crust into a tough one.
A: Not at all. This entire recipe is made by hand with a pastry cutter. Many bakers actually prefer the hand method because it gives you more control and helps you avoid overworking the dough. A food processor can overmix if you are not careful, which leads to a tougher crust.
A: Pie crust shrinks when the dough has been stretched too much during rolling or when it has not had time to rest before baking. Always let the dough rest in the pan in the refrigerator for at least 10 minutes, and avoid pulling or stretching the dough as you press it in.
A: Yes, vegetable shortening works beautifully in this recipe. It produces a very tender crust with a slightly milder flavor. A blend of half butter and half shortening is also a wonderful option that gives you both flakiness and rich buttery flavor.
Want This as a Free Printable for Your Kitchen?
Print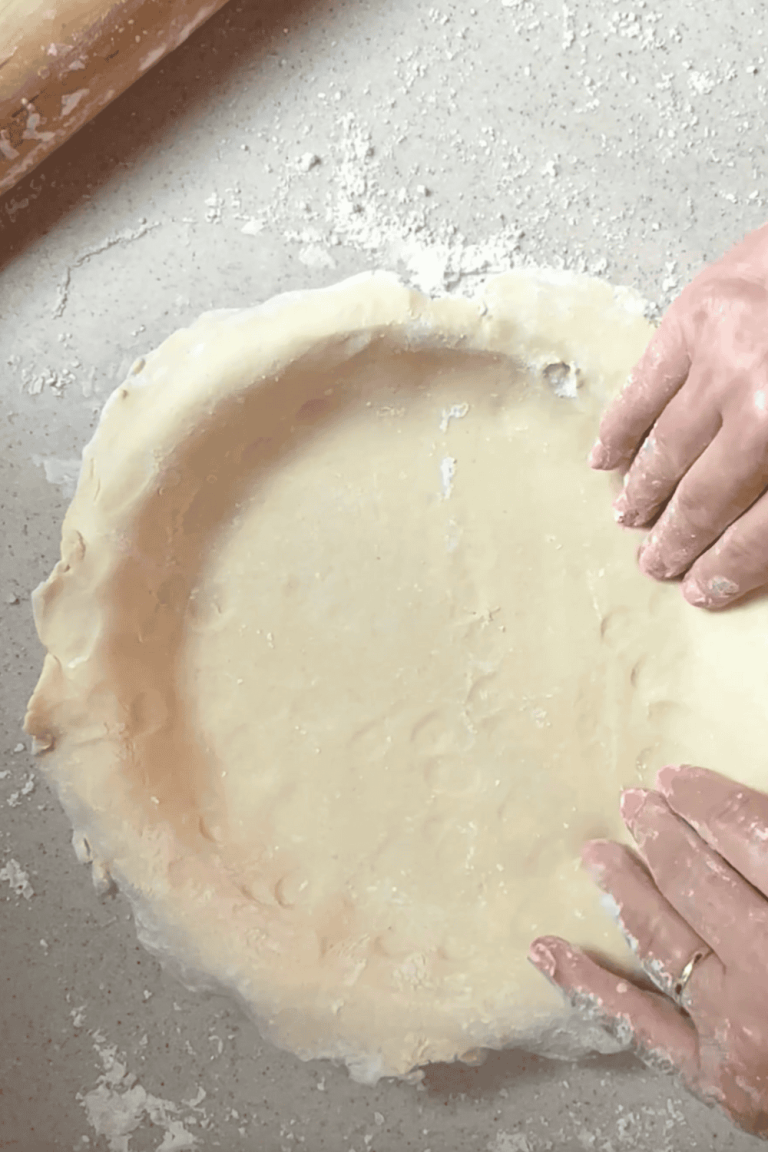
Easy Flaky Pie Crust Recipe Without a Food Processor
This homemade pie crust recipe is buttery, flaky, and made completely by hand with just 4 simple ingredients. No food processor needed. Perfect for apple pie, pumpkin pie, cherry pie, and any savory pie your family loves.
- Total Time: 15 minutes
- Yield: 8 servings 1x
Ingredients
- 2 cups Flour (spoon and level for accuracy)
- 1/2 teaspoon Salt
- Unsalted butter, very cold, cut into small cubes (can also use shortening or half and half)
- 7 to 8 tablespoons of ice-cold water (update: it is very hot today and my pie crust today used 12 tablespoons, start with 7 to 8 and add until the dough comes together.)
Instructions
- Cut the butter into small cubes and place in the freezer for 10 minutes before starting.
- Fill a measuring cup with ice and add at least 6 tablespoons of cold water. Set aside.
- In a large bowl, combine the flour and salt and stir with a fork until mixed.
- Add the cold butter cubes to the flour. Use a pastry cutter to work the butter in until the mixture looks like coarse crumbs with a few pea-sized pieces of butter still visible.
- Add the ice water one tablespoon at a time, stirring gently with a fork after each addition. Stop as soon as the dough just comes together. You may need slightly more or less than 6 tablespoons.
- Gently divide the dough into two equal halves and shape each into a flat disc.
- On a lightly floured surface, roll each disc into a circle about 11 to 12 inches across.
- Roll the dough gently onto your rolling pin and unroll it over the pie pan. Press gently into the bottom and sides without stretching.
- Refrigerate the crust in the pan for 10 minutes before adding your filling.
- Add your filling, lay the second crust on top, trim and flute the edges, and vent the top. Bake according to your pie recipe.
Notes
- Cold butter is everything. Do not skip the freezer step.
- Do not overwork the dough once the water is added or the crust will be tough.
- Refrigerate the crust-lined pan for 10 minutes before filling to prevent a soggy bottom.
- Make ahead: wrap each disc tightly in plastic wrap and refrigerate for up to 3 days, or freeze for up to one month. Thaw overnight in the refrigerator before rolling.
- Prep Time: 15
- Category: Dessert
- Method: Baking
- Cuisine: American
Nutrition
- Serving Size: 1 serving
- Calories: 266
- Sugar: 0.1 g
- Sodium: 148.9 mg
- Fat: 17.6 g
- Carbohydrates: 23.9 g
- Fiber: 0.8 g
- Protein: 3.4 g
- Cholesterol: 45.8 mg
The 10 Best Easy Family Favorite Pie Recipes + Crust
Dutch Apple Crumble Pie
Dutch Apple Crumble Pie is a deliciously sweet apple pie filling in a flakey pie crust with tons of buttery cinnamon crumble topping. Bake it up and enjoy the warm, sweet fragrances of apple pie!
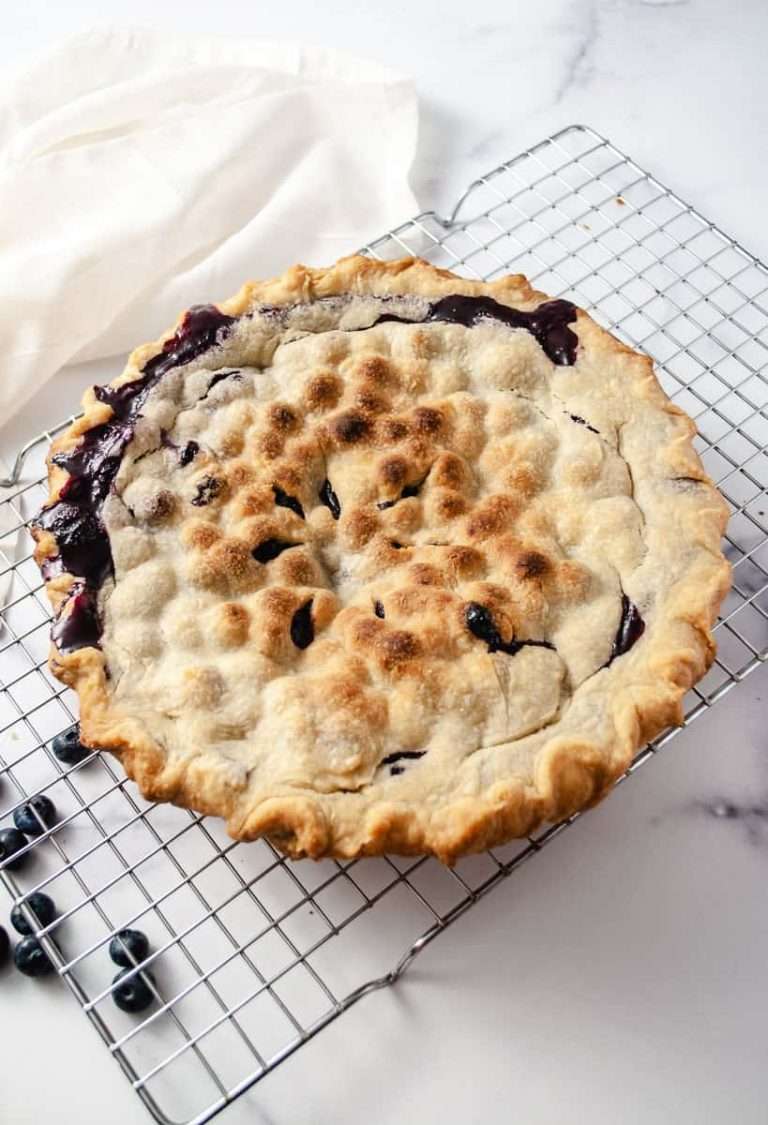
Easy Blueberry Pie with Fresh U-Pick Blueberries
Delicious blueberry pie with a flakey homemade crust made in a mini food processor. Rich dark blue purple filling that tastes like it is summer no matter what time of year.

Classic Homemade Pumpkin Pie
The Classic Pumpkin Pie from the can of Libby Pure Pumpkin to make one pie.


I’ve jarred my own apple pie filling and want to try your crust recipe. My apple pie filling is partially cooked already. How long would I bake this and at what temperature? If you don’t mind me asking.
I would use the same temperature and watch the time to see when the crust is brown. You are just baking the crust and heating up the filling I would check it at 20 minutes and see if it looks done, if not then do another 10 minutes. I have not made an apple pie with filling. let me know how it works out.
Thank you…I will
Oh I hope this crust works for me, I haven’t made them for yrs because the last one turned out like a sun hat but you could wear it in the winter time and not break , too big to be to be a hockey puck so I gave up so I’m crossing my fingers and if I can’t do this Ono I’m really giving up holy moly cause it sounds easy, but then I could screw up Rudolph the Red Nose Reindeer and the kids would think I’m from another planet for petes sake!!! Haha!!! Thank You I’m gonna try this!!!
Even after years mine sometimes are not just right. It takes practice and not working the dough too much, just get it combined with as little handling it and start rolling it out.
Homemade pie crust really is so much better than the ready made stuff. I am going to try yours out! Thanks for sharing 🙂 #happynowlinkup
I am a TERRIBLE baker, so I need all the tips and tutorials I can get if I ever want to make my own pies instead of just buying them! #MerryMonday
Pie crust is one of those things I’ve never made on my own before, mostly because I’m so afraid I’ll mess it up. Looks like I’m going to have to give it a try soon. Thanks so much for sharing at the #happynowlinkup!
They are some work but just have to remember not to overwork it, the less you touch it the better.
I have trouble getting consistent results from my homemade pie crust recipe. one time it’s great, the other its hard and tasteless. Printing yours to give it a try! thanks
That sounds great!! I always want to make my own, but end up buying them at the store to save time. However, that’s not saving money and who knows what is in it. :/ Definitely pinning this to try! Thank you for sharing with us at the #HomeMattersParty
Thank you so much for your kind words. I did go back to making my own for the cost saving. The ones at the store have gotten so expensive.
Susan